
What is Core Data and How to Work With It
Since Core Data seems daunting for many new developers, we’ll try to explain it in simple terms.
Core Data is the framework that you use to manage model-level objects in your application. It provides generalized and automated solutions to common problems related to object lifecycle and object graph management, including persistence.
Wikipedia defines Core Data as “an object graph and persistence framework provided by Apple in the macOS and iOS operating systems.”
However, it doesn’t explain much.
Before we get into a simple explanation of what Core Data is, let’s start by asking why.
Why We Need Core Data
Applications often need to store large amounts of important data. A typical example would be something like a note-taking app, a messenger app, or just about any app that downloads data from a server and wants to avoid the potentially long time to download the same data again.
While you can store data for your note-taking app as a simple file using tools like Codable, this approach doesn’t scale well. For every small change, you need to overwrite the entire file again. If you later decide to change your data model (in this case, your Codable structure/class), you need to be very careful, otherwise, your users could easily lose data, as their file is structured according to the old definition and you changed it. As you probably know, UserDefaults should not be used for storing large amounts of data, but rather for user preferences.
To store and retrieve large amounts of data, you need a database. Typically, standard databases require their own language (SQL) to retrieve and store data. If you want to directly use the database from your Swift code, you will need to manually create SQL commands, execute them, and then manually parse the result. Luckily, we have Core Data to handle all of this for us.
So What is Core Data in Reality?
I think that in the simplest terms, Core Data can be thought of as a layer between the raw database and your Swift code. Internally, it uses an SQLite database, which is essentially a single special file containing logic and data. It is important for us that we can only work with Core Data and instances of Swift classes, which in Core Data store and retrieve data from the database.
The “object graph” and other fancy descriptions mean that Core Data can intelligently monitor your classes, track changes, and when you call “save” in the context of an object, those changes are saved to the database.
The framework also manages migration, which is quite common in the SQL database world. Since these databases have a well-defined structure according to which they save data, if you decide to change your model (this means things like adding/removing properties in your classes, renaming properties or adding relationships), you need to migrate.
It is the process that ensures that the structure of the database (called the “schema”) is up to date and ready for new model definitions. This means that if you have a property name, there is a column in the database to store that information.
If you used the database directly, you would have to do these migrations manually and you could really mess up the database. Fortunately, Core Data can handle a lot of changes through automatic migration, which means you don’t have to do anything.
Besides getting and saving data, there is another important thing that Core Data does for you – the relationship between objects. If you have an object, for example, a Folder, and it contains an array of notes, then you need to save this information along with the folder and notes. In the SQL world, you will need to define a special kind of key that will bind them together. If you establish relationships through Core Data, you get it all automatically. This way, you can work with related objects without having to worry about manually creating and managing relationships.
There are tons of things we could go deeper into, but since this is an introduction, let’s skip everything and go over the parts that make up Core Data.
Core Data Elements
In this section, we’ll go over the main pieces of Core Data that you’ll come across as you start using them.
.xcdatamodeld
This is a Core Data model file, usually named something like Model, Database, or as the current project. Basically, this is a template for Core Data, which tells it what objects we plan to store, what are their properties, and the relationship between them.
If you open it in Xcode, you can add entities and customize their properties, among other things. These entities are then turned into corresponding classes that inherit from NSManagedObject. You can either let Xcode generate them, or you can create your own, which is recommended.
There is nothing mysterious about this file, it is just an XML file (XML is a standardized format for exchanging data, which means different programming languages know how to open it). In fact, we can view this file and see the inner content. Xcode won’t let you see the original file, but you can find it on disk and open it in any text editor. If you choose one that supports XML syntax, it will be easier to read.
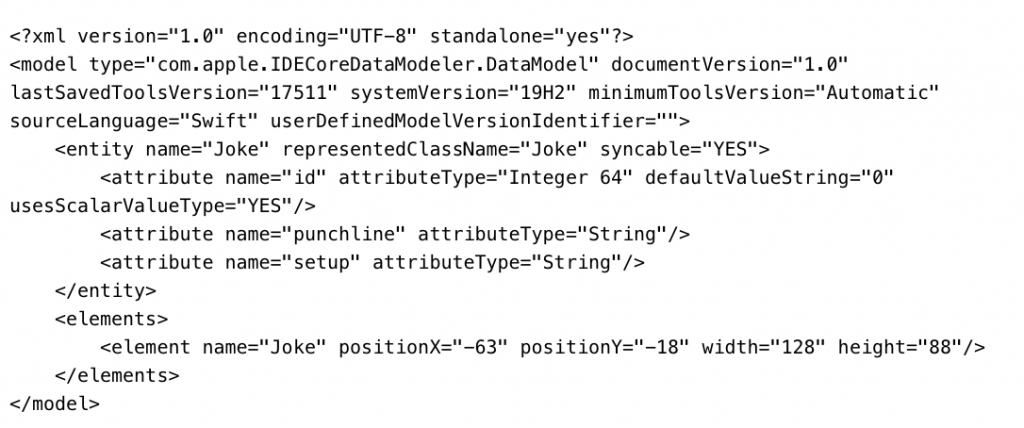
NSManagedObject
All Core Data classes are subclasses, which allows them to work with Core Data. These are standard Swift classes with a few additional annotations. Above we saw the Joke entity represented in the model, and here it is represented as a class:
import CoreData
class Joke: NSManagedObject {
    @NSManaged var id: Int
    @NSManaged var setup: String
    @NSManaged var punchline: String
    @NSManaged var created: Date
}
@NSManaged is a special annotation that allows Core Data to work with these properties in a special way. This is not a property wrapper, although it looks the same. Thanks to the Core Data attribute, it can track changes in object properties and therefore know what needs to be saved.
It also allows Core Data to populate these properties as needed, they can be empty without our knowledge or concern.
Core Data entities are often returned as “faults,” which means they are empty objects and the data will be filled when your application requests it. This is a great optimization. If you get 1000 objects from Core Data, and your collection only displays 20 of them without custom scrolling, the rest of the objects don’t need to have the data in memory.
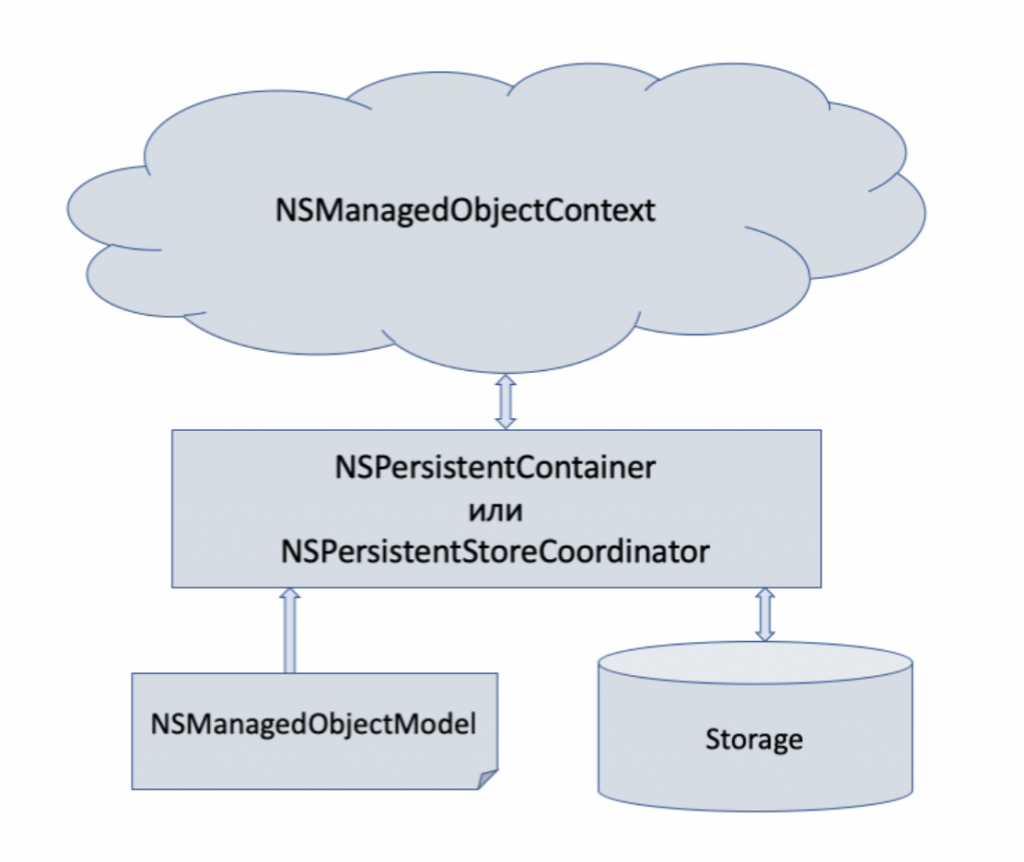
NSPersistentContainer
This is the “main” class that covers working with Core Data. Its responsibilities include loading the data model (.xcdatamodeld file) and possibly reacting if it cannot find it or the classes for certain entities are missing. Typically you will initiate it with the name of the model file and then call loadPersistentStores to load. It also has a very important property called viewContext, which is NSManagedObjectContext, which we’ll cover next.
NSManagedObjectContext
This class allows us to get data from the database as well as store it. You get the data by calling “fetch” in this context, which requires an NSFetchRequest instance. Your application usually has one main context (which can be sufficient in many cases). This context has related entities, so it can track changes and save them when needed.
This is also the reason why you need to pass context to NSManagedObject initialization. This way you associate the object with the context that will manage it. Apart from the fetch already mentioned, you will probably use the save method a lot, and there is also a hasChanges property to check before saving.
Before we continue, we need to go back to the NSPersistentContainer. We can call performBackgroundTask on it, which will give us closure with a background NSManagedObjectContext as input. This way we can do background work on the database quite easily without affecting the apparent performance. You can use the selection in this background context, modify the entities, and then save them.
NSFetchRequest
The NSFetchRequest tells NSManagedObjectContext what you want and how. This is common to NSManagedObject and allows us to specify what type of entity we want to get. You can then customize the filter (using NSPredicate) as well as sorting (using an array of NSSortDescriptor instances). In basic cases, only sorting is needed because you probably want to show the user all the data.
There are a few tricky use cases, but I think that’s enough for now.
NSPredicate
This is the “filtering method” in the Core Data world. It has a weakness because you need to specify it as a custom formatted string, and if you make a mistake, you only know when you start the application. Here’s a very simple example:
NSPredicate(format: "%K == %@", #keyPath(Note.wasDeleted), NSNumber(value: false))
This uses Swift’s #keyPath function, at least to provide some security. Let’s take a closer look at the short format string:% K ==% @. These percentages mark the portions of the string that should be replaced with a value. In this case,% K is reserved for paths, and % @ is reserved for objects. The value inside % @ will be quoted. NSNumber is a holdover from ObjC and is sort of an acceptable way of working with bool values in NSPredicate.
The above predicate will filter Note entities for which the wasDeleted property is false. Marking items as deleted instead of deleting them is called “soft deletion” and is very useful. You can easily implement something like the Trash feature and also if you are handling cloud sync this is essentially needed to keep track of deleted items.
We could rewrite the above predicate differently:
NSPredicate(format: "wasDeleted == %@"), NSNumber(value: false))
This is shorter, but if we rename wasDeleted in the futureб it will stop working. Another, even shorter option:
NSPredicate(format: "wasDeleted == NO"))
To do this, you need to know that false corresponds to “NO” and true to “YES”.
NSSortDescriptor
With an instance of this class, we can tell NSFetchRequest how to sort our entities. You can provide an array, and the order will determine how the items are sorted by multiple properties. The initialization expects a key and boolean to indicate whether the sort will be ascending or descending (12345 versus 54321). Similar to NSPredicate, we highly recommend using #keyPath to avoid potential problems when renaming attributes.
NSSortDescriptor(key: #keyPath(Note.title), ascending: true)
This is a basic example that sorts Note objects by their title. If we wanted to show featured notes first, we would pass this array to NSFetchRequest.
[
    NSSortDescriptor(key: #keyPath(Note.isFavorite), ascending: true),
    NSSortDescriptor(key: #keyPath(Note.title), ascending: true)
]
First, we got all featured notes sorted by title, and then all the others, also sorted by title.
NSFetchedResultsController
Usually abbreviated as “FRC”, this class is primarily created for UITableView and UICollectionView. It manages the retrieval of data from the database for you and also tells you the number of sections and items in specific sections that are required to implement data sources.
Another big advantage is that it notifies us of changes to the database. We can then implement the delegate method and respond appropriately: insert new lines, delete lines, or update. It’s not trivial, but still easier than doing it all by hand.
Starting with iOS 13, we would recommend using a variety of data sources that make it much easier to work with these collection views and FRCs. But that’s a topic for another article.
Stay tuned with Software Focus!